- Home
- WITSMLstudio
- WITSMLstudio Portal
- WITSML Browser Setting Functionalities
Documentation
Connections enable setting up and establishing a connection to a WITSML server. It also enables querying a server’s supported version.
Connect to an Existing Connection
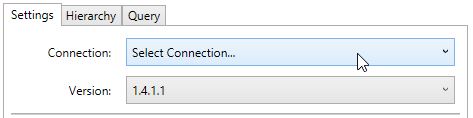
- Click “Select Connection…”
- Select existing connection
Connect to an Existing Connection

- Click “Select Connection…”
- Select “(Add New Connection)”
- Enter the following
- Name - a unique name for this connection
- URL - web address of the WITSML server
- User Name - name of user
- Password - password of user
- Optionally check “Pre-Authenticate” to send the Authorization header with every web request
- Click “Test” to test the connection
- Click “OK” to save and connect
Add a Connection using JSON Web Token (JWT)
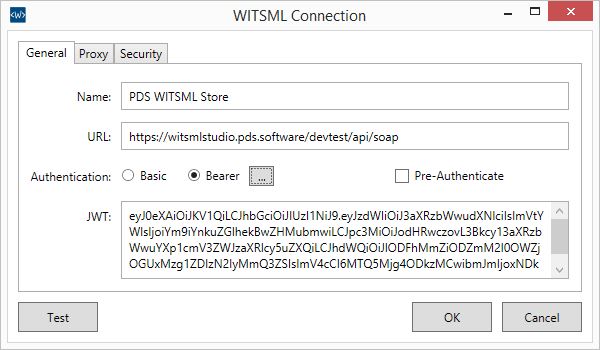
- Click “Select Connection…”
- Select “(Add New Connection)”
- Click “Bearer”
- Enter the following
- Name - a unique name for this connection
- URL - web address of the WITSML server
- Optionally click on […] button next to the Bearer authentication option to retrieve a JSON Web Token from a Token Provider Service
- Optionally check “Pre-Authenticate” to send the Authorization header with every web request
- Click “Test” to test the connection
- Click “OK” to save and connect
Retrieve a JSON Web Token (JWT) from a Token Provider Service
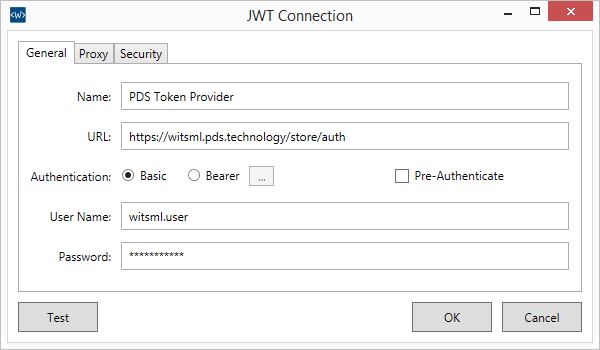
- Click on […] button next to the Bearer authentication option
- Enter the following
- Name - a unique name for this connection
- URL - web address of the WITSML server
- User Name - name of user
- Password - password of user
- Optionally check “Pre-Authenticate” to send the Authorization header with every web request
- Click “Test” to test the connection
- Click “OK” to save and connect
Add Proxy Authentication

- Click “Proxy” to add a proxy to use for the connection
- Enter the following
- Host - the hostname or IP address of the proxy server
- Port - the port number used by the proxy server for client connections
- User Name - name of user
- Password - password of user
- Optionally check “Use Default Credentials” to use the current windows proxy user credentials
- Click “Test” to test the connection
- Click “OK” to save and connect
Select Security Protocols

- Click “Security” to select security protocols
- Select from the following
- TLS 1.2 - Transport Layer Security protocol defined in RFC 5246 in August 2008
- TLS 1.1 - Transport Layer Security protocol defined in RFC 4346 in April 2006
- TLS 1.0 - Transport Layer Security protocol defined in RFC 2246 in January 1999
- SSL 3.0 - Secure Sockets Layer protocol
- Optionally check “Accept Invalid Certificates” to accept all server certificates regardless of validity
- Click “Test” to test the connection
- Click “OK” to save and connect
Edit a Connection
- Click “Select Connection…”
- Click “edit” for the connection you would like to edit.
- Update the connection
- Click “Test” to test the connection
- Click “OK” to save and connect
Delete a Connection
- Click “Select Connection…”
- Click “delete” for the connection you would like to delete.
- Click “OK” when prompted “Are you sure you want to delete the connection?”
Select a Version
After connecting to a WITSML server, all supported versions will be listed with the most current version selected by default. To select another version, follows these steps.

- Click Version drop-down
- Select a version
The Results tab will display the server capabilities of the selected version.
API Functions enable selection of WITSML API functions to query the server for return/error code messages, server-supported versions, and server capabilities.
API Function
Provides a list of WITSML API functions.
- AddToStore
- GetFromStore
- UpdateInStore
- DeleteFromStore
Select an API Function
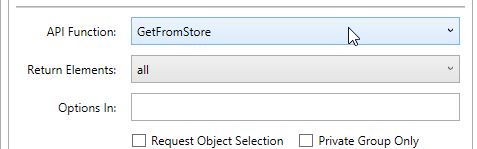
- Click the “API Function” drop-down
- Select an API function
The availability of Query Options is based on the API selected.
Get return/error code message

- Enter a WITSML return/error code
- Click “Get Base Msg” button
- View message in the Results tab
Get Version
- Click “Get Version” button
- View supported versions in the Results tab
Get Server Capabilities
- Click “Get Cap” button
- View server capabilities in the Results tab
Output options specify the parameters that will determine if and when the result will be saved to disk and whether or not to separate by data object.
Output Options

- Output Path - path where result files are saved
- Auto-Save Size - results greater than this number of characters will be saved to file
- Save Results to Disk - all results will be saved to disk
- Split Files by Data Object - creates separate files for each data object returned
Query options are located directly below the “API Functions” drop-down. Availability of these options are determined by the currently selected API Function. All options apply to GetFromStore except for “Cascade Delete” which apply to DeleteFromStore.
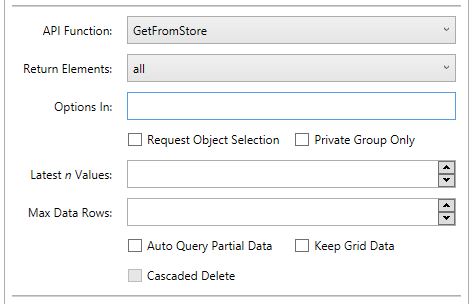
OptionsIn Parameters
- Return Elements - provides a list of return element values
- Options In - free-form data entry of OptionsIn parameters
- Request Object Selection - request the server return a template that defines the items supported by the server for object selection (keyword:requestObjectSelectionCapability)
- Private Group Only - query objects that have the field privateGroupOnly set in the common data
- Latest n Values - specifies the last n values to be returned from each curve in a log data-object (keyword:requestLatestValues)
- Max Data Rows - specifies the number of returned growing sub-nodes; defaults to return everything if not specified (keyword:maxReturnNodes)
- Cascaded Delete - add “cascadedDeleted=true” keyword to OptionsIn parameter
Partial Data Options
- Auto Query Partial Data - automatically query for additional log data if query returns partial data
- Keep Grid Data - keep data in Data tab with each query